
Editor’s Note: This is an older post written back in 2014 that we’ve decided to repost because we feel the information could be helpful for users today.
Earlier this summer, when OS X Yosemite’s developer preview became available, I decided to install it on a partition on my Mac. After the public beta came out, it was time to install that on a separate Mac and delete the partition from my MacBook Pro. Many things complicated the process, but I thought I’d use my annoyance to help some of you who may experience the same thing. Here is the easiest way I found to reclaim that previous space.
1) Create a USB installer for OS X Mavericks. Once you download Mavericks, you can use this command to create the USB in Terminal. If you’d like a step by step guide to do this, click here.
sudo /Applications/Install OS X Mavericks.app/Contents/Resources/createinstallmedia --volume /Volumes/untitled --applicationpath /Applications/Install OS X Mavericks.app --nointeraction
2) Reboot your Mac using the USB drive we just created. Hold the Option key while booting your Mac and select the USB installer created in Step 1.
3) Enable the Debug menu in Disk Utility by opening Terminal (Utilities>Terminal in the menubar) and executing this command.
defaults write com.apple.DiskUtility DUDebugMenuEnabled 1
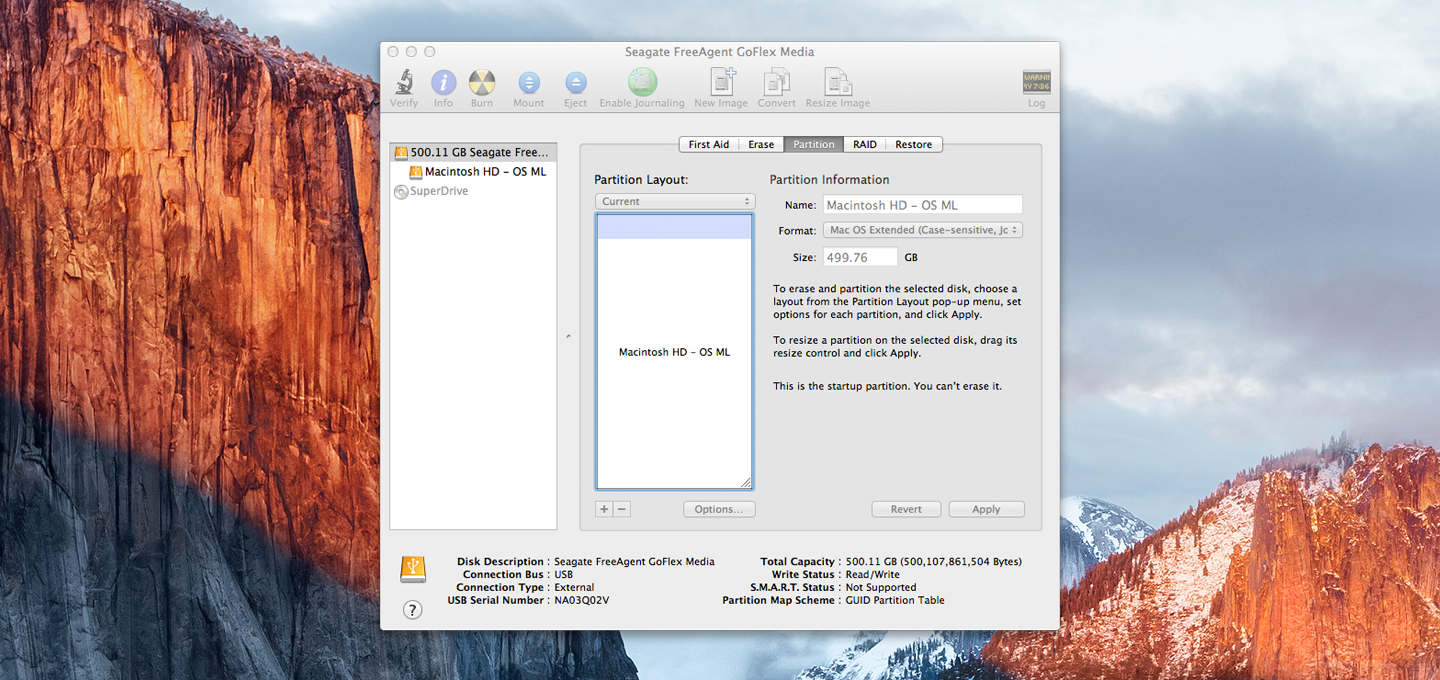
4) Quit out of Terminal and open Disk Utility. Open the Debug menu and enable the “Show All Disks” option.
5) Select the Recovery HD. Click on the Erase tab and erase it. We’ll create this later.
6) Click on your hard drive (the first item listed above all of the partition names) and open the Partition tab.
7) Delete the partition that you originally wanted to delete by clicking on the ‘-‘ sign under the partition layout. After that is deleted, select the Recovery HD partition and click the ‘-‘ to delete that as well.
8) Select your operating system drive and use the arrow made from 3 lines in the bottom right corner of the partition layout to expand the size of that partition to fill the drive.
9) Click on the Apply button to save the changes.
At this point you’ll should be back to one partition, but you’ll notice that you no longer have a recovery partition, which will cause a few services, such as FileVault to stop working. We’ll fix that next.
10) Boot back into OS X and download the Recovery Partition Creator from here. You’ll also need the OS X installer downloaded in Step 1, so be sure to save that file until we’re done.
11) Run the Script and follow the prompts to recreate your recovery drive. If you’d like a full step by step guide, click here.
12) Once the process is finished, reboot your Mac and hold the command and ‘R’ keys to test your new recovery partition.
A couple of notes…
1) It is also recommended to back up your data prior to starting this process.
2) TechInform is NOT responsible for any data loss or other problems you may run into during this process.
